2.3 KiB
Visual Studio Code
VSCode suppport for C/C++ and CMake is provided by the Microsoft C/C++ extension pack. You can install it from the VSCode extensions tab.
If you use a unofficial VSCode distribution like VSCodium, you will need to install the
extension pack manually by downloading the VSIX files and going to Extensions > ... > Install from VSIX.
CMake support for VSCode uses CMake presets provided by the project by default.
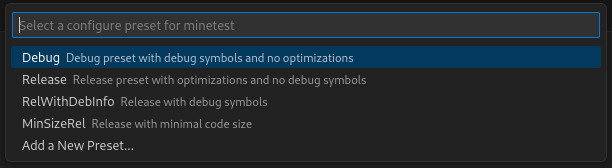
When you open the Minetest folder with VSCode, you should get a quick pick asking you for the default preset.
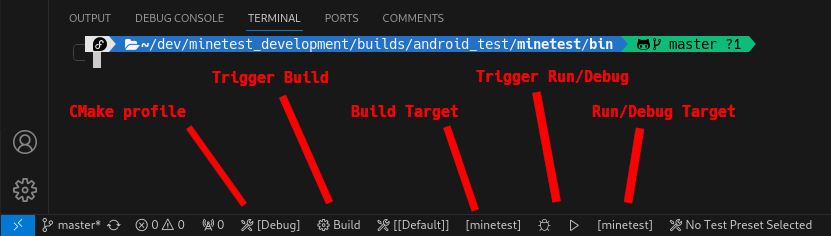
You can use the bottom bar to change the CMake profile, change the build target, build, run and debug (running/debugging doesn't build first).
Like most of the VSCode experience, it may be faster to use commands directly (most of the VSCode UI just trigger commands).
| Command Name | Usecase |
|---|---|
CMake: Select Configure Preset |
Change the current CMake profile |
CMake: Set Build Target |
Change the current build target |
CMake: Build |
Build current target |
CMake: Clean |
Clean build files |
CMake: Run Without Debugging |
Run selected run target |
CMake: Debug |
Debug selected run target |
Windows
Under Windows, the recommended compiler is the Visual Studio compiler.
From the Visual Studio installer, you need to install the Desktop development with C++ Workload.
Vcpkg is the recommended way of installing Minetest dependencies.
Follow the official documentation to install it and install Minetest dependencies as explained in Windows compilation process.
You need to let CMake know about the vcpkg installation in VSCode.
Modify your .vscode/settings.json:
{
    "cmake.configureSettings": {
        "CMAKE_TOOLCHAIN_FILE": "C:/path/to/vcpkg/scripts/buildsystems/vcpkg.cmake"
    }
}